The Real-World Accuracy of 3D LiDAR Scanning With FARO S150 & S350 Scanners

When people first explore 3D LiDAR scanning, one of the most eye-catching numbers in any product brochure is the advertised accuracy. FAROโ€™s Focus S150 and S350 scanners are often promoted as delivering โ€œยฑ1 mm accuracy,โ€ which sounds definitive and easy to rely on for engineering, mining and fabrication work. But anyone who has spent time working with 3D LiDAR scanning in real industrial environments understands that accuracy isnโ€™t a single number โ€” it is a system of interrelated factors.

This article explains what the ยฑ1 mm specification from FARO really means, how accuracy shifts with distance, and what engineers, project managers and clients need to do to achieve dependable results when applying 3D LiDAR scanning on live sites.
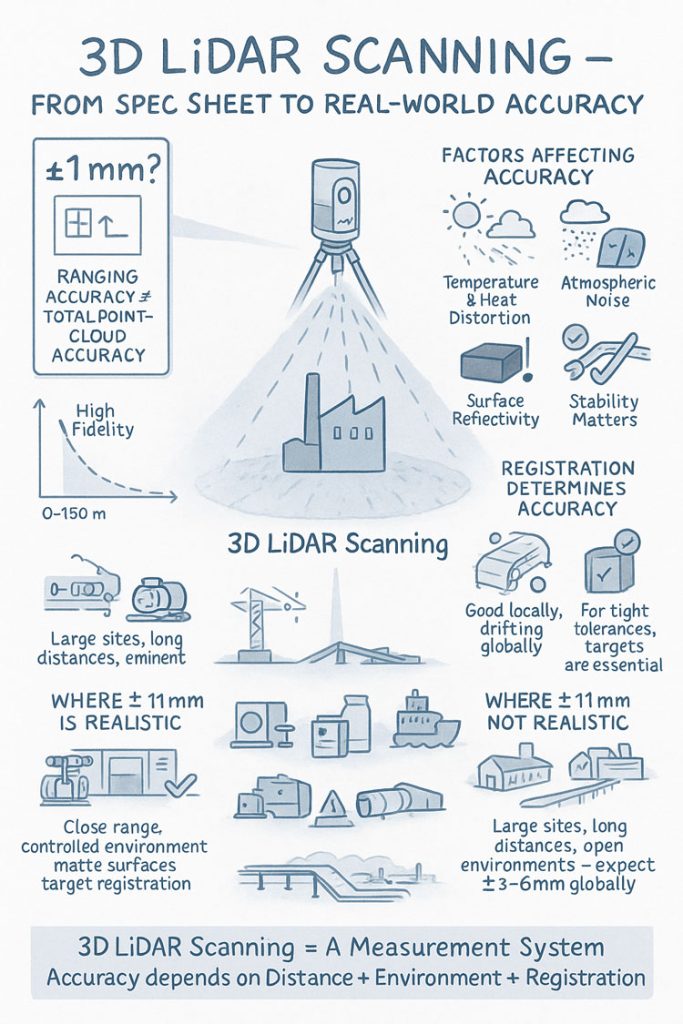

Infographic explaining 3D LiDAR scanning accuracy, showing a scanner capturing a building and highlighting factors that affect accuracy such as temperature, atmospheric noise, surface reflectivity and tripod stability. Includes diagrams comparing realistic versus unrealistic ยฑ1 mm accuracy, the impact of distance, environment and registration quality, and notes that large open sites typically achieve ยฑ3โ€“6 mm global accuracy.

1. What FAROโ€™s โ€œยฑ1 mm Accuracyโ€ Really Means in 3D LiDAR Scanning

The ยฑ1 mm number applies only to the internal distance measurement unit inside the scanner. It reflects how accurately the laser measures a single distance in controlled conditions.

It does not guarantee:

  • ยฑ1 mm for every point in a full plant model
  • ยฑ1 mm for every dimension extracted for engineering
  • ยฑ1 mm global accuracy across large multi-scan datasets

In 3D LiDAR scanning, ranging accuracy is just one ingredient. Real-world accuracy is shaped by distance, reflectivity, scan geometry and how multiple scans are registered together.


2. How Accuracy Changes With Distance in Real Projects

Even though the S150 and S350 list the same ranging accuracy, their 3D LiDAR scanning performance changes as distance increases. This is due to beam divergence, angular error, environment and surface reflectivity.

Typical real-world behaviour:

  • 0โ€“10 m: extremely precise, often sub-millimetre
  • 10โ€“25 m: excellent for engineering work, only slight noise increase
  • 25โ€“50 m: more noticeable noise and increasing angular error
  • 50โ€“100 m: atmospheric distortion and reduced overlap become evident
  • Near maximum range: still useful for mapping conveyors, yards and structures, but not suitable for tight fabrication tolerances

This distance-based behaviour is one of the most important truths to understand about 3D LiDAR scanning in field conditions.


3. Ranging Accuracy vs Positional Accuracy vs Global Accuracy

Anyone planning a project involving 3D LiDAR scanning must distinguish between:

Ranging Accuracy

The ยฑ1 mm value โ€” only the distance measurement.

3D Positional Accuracy

The true X/Y/Z location of a point relative to the scanner.

Global Point Cloud Accuracy

How accurate the entire dataset is after registration.

Global accuracy is the number engineers depend on, and it is normally around ยฑ3โ€“6 mm for large industrial sites โ€” completely normal for terrestrial 3D LiDAR scanning.


4. What Real Field Testing Reveals About FARO S-Series Accuracy

Independent practitioners across mining, infrastructure, CHPPs, plants and structural environments report similar results when validating 3D LiDAR scanning against survey control:

  • ยฑ2โ€“3 mm accuracy in compact plant rooms
  • ยฑ5โ€“10 mm across large facilities
  • Greater drift across long, open, feature-poor areas

These outcomes are not equipment faults โ€” they are the natural result of how 3D LiDAR scanning behaves in open, uncontrolled outdoor environments.


5. Why Registration Matters More Than the Scanner Model

Most real-world error in 3D LiDAR scanning comes from registration, not the laser itself.

Cloud-to-Cloud Registration

Good for dense areas, less reliable for long straight conveyors, open yards or tanks.

Target-Based Registration

Essential for high-precision engineering work.
Allows tie-in to survey control and dramatically improves global accuracy.

If your project needs ยฑ2โ€“3 mm globally, target control is mandatory in all 3D LiDAR scanning workflows.


6. Surface Reflectivity and Environmental Effects

Reflectivity dramatically affects measurement quality during 3D LiDAR scanning:

  • Matte steel and concrete return excellent data
  • Rusted surfaces return good data
  • Dark rubber, black plastics and wet surfaces reduce accuracy
  • Stainless steel and glass behave unpredictably

Environmental factors โ€” wind, heat shimmer, dust, rain โ€” also reduce accuracy. Early morning or late afternoon typically produce better 3D LiDAR scanning results on mining and industrial sites.


7. When ยฑ1 mm Is Actually Achievable

True ยฑ1 mm accuracy in 3D LiDAR scanning is realistic when:

  • Working within 10โ€“15 m
  • Surfaces are matte and reflective
  • Registration uses targets
  • Tripod stability is high
  • Conditions are controlled

This makes it suitable for:

  • Pump rooms
  • Valve skids
  • Structural baseplates
  • Reverse engineering
  • Small mechanical upgrades

But achieving ยฑ1 mm across a full plant, CHPP, or yard is outside the capability of any terrestrial 3D LiDAR scanning workflow.


8. S150 vs S350: Which One for Your Accuracy Needs?

S150 โ€“ Engineering-Focused Precision

Ideal for industrial rooms, skids, structural steel and retrofit design work where short-to-mid-range accuracy is essential.

S350 โ€“ Large-Area Coverage

Perfect for conveyors, rail lines, yards, and outdoor infrastructure.
Global accuracy must be survey-controlled for tight tolerances.

Both scanners deliver excellent 3D LiDAR scanning performance, but the S150 is the engineering favourite while the S350 is the large-site specialist.


9. What to Specify in Contracts to Avoid Misunderstandings

Instead of stating:

โ€œScanner accuracy ยฑ1 mm.โ€

Specify:

  • Local accuracy requirement (e.g., ยฑ2 mm at 15 m)
  • Global accuracy requirement (e.g., ยฑ5 mm total dataset)
  • Registration method (mandatory target control)
  • Environmental constraints
  • Verification method (e.g., independent survey checks)

This ensures everyone understands what 3D LiDAR scanning will realistically deliver.


10. When a Terrestrial Scanner Is Not Enough

Do not rely solely on 3D LiDAR scanning for:

  • Machine alignment <1 mm
  • Bearing or gearbox placement
  • Certified dimensional inspection
  • Metrology-level tolerances

In these cases, supplement scanning with:

  • Laser trackers
  • Total stations
  • Metrology arms
  • Hybrid workflows

Conclusion: The Real Truth About 3D LiDAR Scanning Accuracy

FAROโ€™s S150 and S350 are outstanding tools for industrial 3D LiDAR scanning, but the ยฑ1 mm spec does not tell the full story. Real-world accuracy is a combination of:

  • Distance
  • Registration method
  • Surface reflectivity
  • Site conditions
  • Workflow discipline

When used correctly, these scanners consistently deliver high-quality, engineering-grade point clouds suitable for clash detection, retrofit design, fabrication planning and as-built documentation.

3D LiDAR scanning is not just a laser โ€” it is an entire measurement system.
And when the system is applied with care, it produces reliable, repeatable data that reduces rework, improves safety, and strengthens decision-making across mining, construction, fabrication and industrial operations.

Where Is your project

3D Scanning Sydney CBD3D Scanning Brisbane CBD
3D Scanning across Melbourne3D Scanning across Perth
3D Scanning across Adelaide3D Scanning in The Hunter Valley
3D Scanning Mount Isa3D Scanning Emerald
3D Laser Scanning Central Coast3D Scanning in The Pilbara
3d Scanning other Areas of Australia3D Scanning Outside Australia
Hamilton By Design logo displayed on a blue tilted rectangle with a grey gradient background
Name
You would like to:

3D CAD Modelling | 3D Scanning

3D Experience Platform Login

3D Scanning for Construction

Transforming Projects with 3D Scanning

3D LiDAR Scanning โ€“ Digital Quality Assurance

Maximizing Equipment Efficiency with ISO 18436.2 Maintenance Strategies

At Hamilton By Design, we know that keeping your equipment running efficiently isnโ€™t just about quick fixes; itโ€™s about adopting the right maintenance strategies to ensure long-term reliability and performance. With advancements in condition monitoring and diagnostic techniques, the ISO 18436.2 standard has become a cornerstone for effective maintenance practicesโ€”and itโ€™s at the heart of how we help our clients optimize their operations.

In this blog post, weโ€™ll explore the major maintenance strategies aligned with ISO 18436.2 and how they can transform your plantโ€™s productivity.


What is ISO 18436.2?

ISO 18436.2 is an internationally recognized standard that defines the competencies required for personnel performing condition monitoring and diagnostics. It focuses on advanced tools like vibration analysis, helping engineers identify equipment issues before they lead to costly downtime.

At Hamilton By Design, our team is ISO 18436.2-certified, meaning we bring the highest level of expertise to your maintenance needs.


Maintenance Strategies That Deliver Results

ISO 18436.2 aligns with several key maintenance strategies designed to improve reliability, minimize downtime, and optimize equipment performance. Hereโ€™s how they work:

1. Reactive Maintenance

Reactive maintenance is the traditional โ€œrun-to-failureโ€ approach where repairs are made after a breakdown. While not ideal for critical assets, tools like vibration analysis can still play a role by identifying root causes post-failure. This can help inform more proactive strategies in the future.

2. Preventive Maintenance (PM)

Preventive maintenance involves scheduling regular maintenance tasks to prevent failures. While effective to some extent, PM can lead to over-maintenance. By incorporating vibration analysis and other condition monitoring techniques, preventive measures can be more precisely targeted, reducing unnecessary downtime.

3. Condition-Based Maintenance (CBM)

Condition-Based Maintenance uses real-time equipment data to identify issues as they arise. This strategy is central to ISO 18436.2 and includes tools like vibration analysis, thermography, and ultrasonic testing. CBM ensures that maintenance is performed only when necessary, saving time and money.

Benefits:

  • Reduces unplanned downtime.
  • Optimizes maintenance schedules.
  • Extends equipment lifespan.

4. Predictive Maintenance (PdM)

Predictive Maintenance takes CBM a step further, using data trends and analytics to predict when failures are likely to occur. With the expertise of ISO 18436.2-certified personnel, PdM uses advanced tools to detect subtle signs of wear or stress, allowing for intervention before a problem becomes critical.

Key Tools:

  • Vibration analysis for early detection of imbalance or misalignment.
  • Infrared thermography to spot heat anomalies.
  • Ultrasonic testing to identify leaks and material defects.

5. Reliability-Centered Maintenance (RCM)

RCM focuses on understanding the specific failure modes of critical assets and tailoring maintenance strategies accordingly. This approach integrates condition monitoring insights to prioritize tasks that align with operational goals.

Benefits:

  • Aligns maintenance efforts with production priorities.
  • Reduces the risk of unexpected equipment failures.

6. Proactive Maintenance

Proactive maintenance identifies and addresses root causes of recurring issues. By analyzing data from vibration and other diagnostic tools, engineers can resolve underlying problems like misalignment, improper lubrication, or material fatigue.

Impact:

  • Prevents repetitive failures.
  • Improves long-term equipment reliability.

7. Total Productive Maintenance (TPM)

TPM involves a plant-wide effort, from operators to management, to ensure optimal equipment effectiveness. ISO 18436.2-certified personnel can support TPM by providing actionable condition monitoring insights and training operators in basic diagnostic techniques.


How Hamilton By Design Helps

At Hamilton By Design, we bring these strategies to life through tailored maintenance solutions that align with your plantโ€™s needs. Hereโ€™s how we can help:

1. Advanced Condition Monitoring:
Our team uses state-of-the-art tools to monitor equipment health, including vibration analysis, thermography, and ultrasonic testing.

2. Tailored Maintenance Plans:
Every plant is unique. We develop maintenance strategies based on your specific equipment, production goals, and operational priorities.

3. Expert Training and Certification:
We empower your team by offering ISO 18436.2 training, giving them the skills to sustain and enhance maintenance programs.

4. Ongoing Support:
Maintenance is a journey, not a destination. We provide continuous support to refine and optimize your practices as your operations evolve.


The Hamilton By Design Advantage

Adopting advanced maintenance strategies aligned with ISO 18436.2 isnโ€™t just about improving equipment reliabilityโ€”itโ€™s about unlocking greater productivity and profitability for your business.

With our expertise, you can transition from reactive to predictive maintenance, reduce unplanned downtime, and extend the lifespan of your critical assets.

Ready to take your plantโ€™s maintenance strategy to the next level? Contact Hamilton By Design today to find out how we can help.

Visit us at: www.hamiltonbydesign.com.au
Email us: sales@hamiltonbydesign.com.au
Call us: +61 0477 002 249


Hamilton By Design | Transforming Maintenance | Elevating Performance | Mechanical Engineering

Mechanical Engineering Challenges for Conveyor Reliability

The challenges Mechanical Engineers have when it comes to maintaining the reliability of conveyor systems for transporting bulk materials, particularly particles ranging from 1mm to 100mm, presents mechanical engineers with a host of challenges. Reliability maintenance aims to ensure that these systems operate consistently and efficiently over their operational lifespan, minimizing downtime and optimizing productivity. Here are some key challenges faced by mechanical engineers in this regard:

1. Component Wear and Failure: The continuous operation of conveyor systems subjects various components such as belts, rollers, bearings, and drive mechanisms to wear and potential failure. The abrasive nature of bulk materials can accelerate this process, leading to shortened component lifespan and increased risk of unexpected breakdowns. Mechanical engineers must implement proactive maintenance strategies, including regular inspections, lubrication, and component replacement, to mitigate wear-related issues and enhance system reliability.

2. Material Contamination and Blockages: Bulk materials containing particles of diverse sizes can lead to material contamination and blockages within conveyor systems if not properly managed. Fine particles may accumulate in chutes, transfer points, or on conveyor surfaces, causing flow disruptions and increased friction. Engineers need to design systems with effective cleaning mechanisms, such as scrapers, brushes, and air blowers, to prevent material buildup and maintain uninterrupted material flow.

3. Misalignment and Tracking Issues: Misalignment of conveyor belts and tracking problems can result in uneven material distribution, increased friction, and premature wear on system components. Mechanical engineers must ensure proper belt tensioning and alignment during installation and implement monitoring systems to detect and correct any deviations from the desired trajectory. Advanced tracking technologies, such as automated belt positioners and laser alignment tools, can aid in maintaining optimal conveyor performance.

4. Environmental Factors: Harsh environmental conditions, including temperature variations, moisture, dust, and corrosive substances, pose significant challenges to conveyor system reliability. Exposure to such elements can accelerate component degradation and compromise system integrity. Engineers must select durable materials, coatings, and sealing solutions resistant to environmental hazards and implement preventive measures, such as regular cleaning and protective enclosures, to safeguard conveyor systems from adverse effects.

5. Safety and Regulatory Compliance: Compliance with safety regulations and industry standards is essential for ensuring the reliability and safe operation of conveyor systems. Mechanical engineers must stay abreast of regulatory requirements and design systems that meet or exceed applicable standards for material handling equipment. Regular safety inspections, training programs for personnel, and implementation of safety protocols are crucial aspects of reliability maintenance in conveyor systems.

At Hamilton By Design, our team have the experience in addressing these challenges requires a comprehensive approach that combines sound engineering principles, advanced technologies, and proactive maintenance practices. By implementing robust reliability maintenance programs, mechanical engineers can maximize the uptime and longevity of conveyor systems for transporting bulk materials, thereby optimizing operational efficiency and minimizing costly disruptions.

Mechanical Engineering | Structural Engineering

Mechanical Drafting | Structural Drafting

3D CAD Modelling | 3D Scanning

Hamilton By Design